Wednesday 28 March 2012

A Little Baby Bonnet

Hello.

I made up a little baby bonnet a few months ago and have been meaning to blog about it for that long.
I have to say that it is the best baby hat I have ever had. All together my baby has about 4 hats but the only one to stay on is this one.


This was made using the The Abigail Baby Bonnet pattern.
It comes as a PDF pattern from I Think Sew and only cost $3.
This site has quite a few cheap, cute patterns.

I made this hat from the same sheet I made all of these PJ's from.

The hat is reversible so you can make it with 2 different fabrics if you wish.
I made it all white so it works with most of her clothing.

I cheated a little with the ties. Instead of making them out of fabric I used a shoelace (unused of course :) It was pink with silver glitter through it.


This hat has fit her from December last year, right up to now and she still has room
(the pattern does come with a range of different sizes).

I just love it. Once it's tied up it wont come off, no matter how hard your little one tries.
In the end they just give up and leave it on.

Linking up here:


Tuesday 27 March 2012

Organising my sewing centre

Hello.

I want to share how I organise my sewing centre with you all. After beginning this post I realised that it would be too long to show you everthing in one post so I will show you bit by bit as I get around to documenting it.

Lets begin...

A few months ago my Oma (German Nan) moved out of her home and into a nursing home. She was a great sewer, not the most technical but was completely capable of making her own clothes and clothes for any who asked. If you can inherit sewing genes then she was the one who I inherited mine from. Unfortunately I didn't spend enough time with her learning all she knew about sewing before she stopped.

Anyway, when she moved, everything in her home had to be cleared out for the house to be sold.  I pretty much got to have all of her sewing supplies (minus the sewing machine and overlocker, which I didn't need anyway)
My Oma was possibly a hoarder, not one of those whose home you cannot walk through, but one who survived the war and never threw away anything that could be used for something.
It was quite amazing finding 5cm pieces of ribbon saved from the packaging of something that is long gone.

Here are a couple of pictures to show some of the small items I received.

Some of the small items which include...

Lots of Lace

Heaps of Zippers, mostly new, some removed from garments

Bias Binding

Trims

Some extremely vintage bands
Along with all of these items I got a mountain of fabric and thread.
I already had one of these containers to hold my thread, but I needed to purchase another to cope with my new load.
Neatly organised by colours


Now to organise all of the ribbon, lace, trim, elastic, velcro, tape etc... I used the largest zip lock bags I could find.


These stack neatly in the cupboard and make it easy to find what you need.


So that is where I will end this post.
I am off to take some more pictures of sewing centre for my next instalment of
"Organising Your Sewing Centre"

Linking up here:


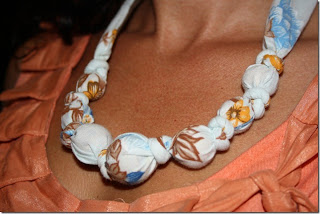
I won a Necklace from Cass Can Sew

Hello.

I entered a giveaway that Cass Can Sew held the other day to mark 100 likers on her facebook page.
She was offering one of her handmade necklaces.
Well I entered and won. It arrived today and I love it.


I just love the colours of the vintage fabric and it just happened to match what I was wearing today.


If you would like one of these stylish necklaces Cass would be happy to create a special order for you. Just contact her through her blog or facebook until her etsy store is up and running.

Thanks so much Cass. I love my new necklace.


Saturday 24 March 2012

Featuring "The Urban Wrap Skirt"

Hello.
I want to shout out a BIG thanks to Pam for featuring my Urban Wrap Skirt skirt on her blog.
It was one of the top 4 viewed skirts.

Pam hosts the best link party's.
They each go for a year so every time you make up a new item you can share it on
It's a great place to visit if you need a little inspiration too, so go check it out now.

Reversible Swing Coat - Free pattern and Tutorial

Hello.

When I was browsing the web the other day I came across this free pattern and tutorial.
It called the Central Park Swing Coat and here is my version.


I made it out of brown suede one side and the same fabric I used for this project for the other side.


It does look rather like the example from the site I got the pattern from
but at least I knew it would look good :)


When I sewed  the buttons on I sewed them on so tightly that I couldn't get them through the buttonhole. I had to unpick them an sew them on loosely so they would go through. 

This was a good little project especially with the free pattern.
 It is a suitable vest to wear over a t-shirt or long sleeve top as the weather gets a little cooler.

Linking Up Here:


Getting Winter Started

Hello.

The other morning it was a little chilly and I noticed I didn't have many warm jackets for my 1 year old so I made this one up today. It is New Look 6927.


I actually made this jacket to match the birthday dress I made a couple of weeks ago.


I wanted it to remain quite plain so it can be worn with many outfits so I just added accents of the pink tartan under the collar and for the facings.


I used black piping around the collar and on the pockets.
The buttons were left over from when I made this dress


Does anyone know if there is a rule about what side the button/buttonholes go?
After I did the buttonholes on the righthand side
(which worked like a dream I might add, it's amazing what a sharp needle will do)
I thought to myself they should have been on the lefthand side.
If anyone has an answer I'd love you to leave a comment :)  


I'm not sure if she was hungry or if she found the jacket tasty but she wouldn't stop chewing her sleeves.


All I can say is...roll on Winter, my girl's got a jacket to wear.


Linking up here:


Thursday 22 March 2012

I was featured at Project Run & Play

Hello.
Well I have to say WOW!
I woke with a nice surprise this morning to find out I had been featured on
Project Run & Play Sewing Kid's Clothes Linky party
for my embroidered pocket pants.
You should totally add them to your linky party list if you have any childrens clothes to show.

Thanks Project Run & Play for the Spotlight.

Wednesday 21 March 2012

Appliance Covers - Mini Tutorial

Hello.
I wanted to make a cover for my kettle and toaster because they were constantly being splattered with oil and food. I saw this tutorial and thought "I could do that".
So I did, and this is the result.


First start with a couple of tea towels.
I picked these ones up for $4.
The tea towel has to be wide enough to cover over your appliance.


Fold it over and cut it to fit your appliance.
Then you need to hem where you cut the tea towel.


Then cut a couple of pieces to fit the ends and sew around each end.


And you're done.


Now any food or oil splats will go on the covers and can be chucked in the wash.

Linking up here:

A Dress for School

Hello.

I have made a few outfits up for my 4 year old for Kindy but most of them are polka dots or tartan in school colours. I thought I would make something a little closer to the proper uniform and this is what I ended up with.


I used the same pattern to make this loveheart dress. This time I just added in some sleeves. I used the sleeve pattern originally for this New Look pattern,  I just made them short sleeves and encased some elastic in the sleeve hem. They came out a little more poofy than I wanted.


The dress was also way longer than I anticipated so I folded it up about 3 inches from the bottom and gave it another seam. In doing this I lost about 6 inches in length which probably made it a little too short. I just put some little shorts underneath, so it's not a problem.


I love the buttons on the back. They really stand out as a feature of the dress.

She looks as pretty as a picture...before school.
By the time I pick her up it's another story.


Linking up here:

Saturday 17 March 2012

Pattern Tested

Hello.

The other day I replied to a request for a pattern tester from Jenilyn from Grits & Giggles.
She is about to release a new pattern for a girls skirt called the Lauren Twirl Skirt.
What a great pattern...so quick and easy.
Here are my skirts.


Well what can I say, it’s such a quick skirt to make. The longest part of making these skirts was choosing the fabric.
The first skirt (size 4) took 1 hour and it only took that long because I made it a double layered skirt.
I made it with ivory cheesecloth and covered the main part of the skirt with black lace that I edged with bias binding.
I pressed the seam of the main part of the skirt and the band up toward the skirt because I wanted the band to remain quite plain.
To finish the contrast band (which I made from the same fabric) I overlocked the bottom and just folded up the hem once, rather than doubling it up and hiding the raw edge like the pattern suggested.

The second one (size 1) took all of 1/2 an hour. Unreal!! I used co-ordinating cotton fabric in beige and black and trimmed it with cute black flower lace.

I just had to take the girls to the park and take some photos while they were enjoying their new skirts.


The girls enjoyed some lunch.
(Despite the look on their faces)


We even managed to feed the ducks. 


We had a great day!

And regarding the pattern...I love it!
 It would suit a beginner or a competent sewer. It ranges in size from 12 months to 5 years, so keep an eye out for it if you are looking for a basic girls skirt pattern that is quick easy and very pretty.

Linking up here:


LinkWithin

Related Posts Plugin for WordPress, Blogger...